活动地址:CSDN21天学习挑战赛
用代码写出浪漫合集(爱心、玫瑰花)
本文目录:
二、用python、matplotlib、Matlab、java绘制爱心
(3)输出五个爱心,由Dear I love you forever! 五个单词填充而成
(1)、6种python玫瑰花绘图源码(立体多层玫瑰、红玫瑰)
一、前言
有缘遇到真心对你好的人不容易,像父母、朋友、真爱你的人,如果遇到了,请好好珍惜,因为有时,有些你想象不到的事情会突然发生,如果遇到了,请别慌乱害怕,那些真心对你的人会陪在你身边和你一起度过最难熬的日子,所以请抓住每一分每一秒,好好对待身边人,凡事别计较太多,把心放宽。在你遇到。。。时,请记住,你并不是唯一一个,这世界上有很多人正在经历着和你一样的事情,虽然他们没有或者无法说出来。
命始于缘分,爱忠于坚守,情长于陪伴,珍惜每一次相识,珍惜每一分温暖,生活细细品味,真情慢慢体会,不枉此生。
这里搜集了一些爱心和玫瑰花的代码,供大家学习参考。代码版权属原作者。
二、用python、matplotlib、Matlab、java绘制爱心


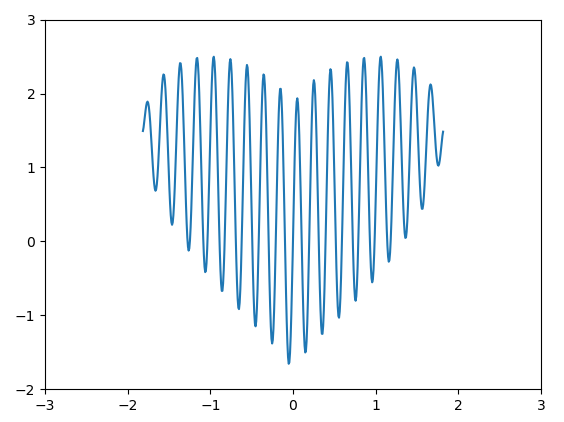
(3)爱心图形3(弧线型)(通过输入方式显示文字) |
|
|
|
请输入表白语句,然后回车,(例如”I Love You”): 请输入要表白的人(例如”李思思”): |
|
转载地址:https://changxin.blog.csdn.net/article/details/109842795 |


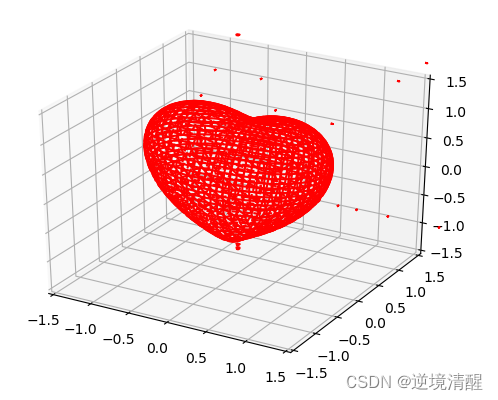
(7)Matlab 3D心形代码 |
|
|
|
原:https://blog.csdn.net/weixin_48117689/article/details/124082260 |
|
|

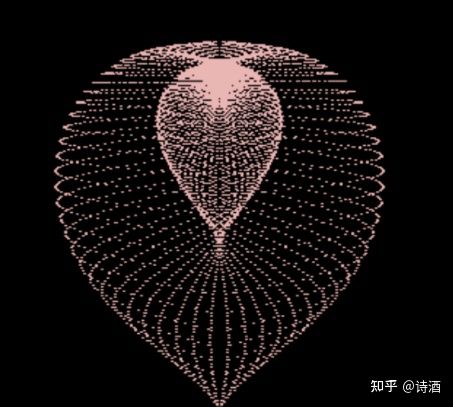
(10)、Python《点燃我温暖你》李峋爱心代码 |
 |
| 转载地址:【双十一特辑】爱心代码(程序员的浪漫)-李峋_天寒雨落的博客-CSDN博客 |
三、用python、java字符画绘制爱心
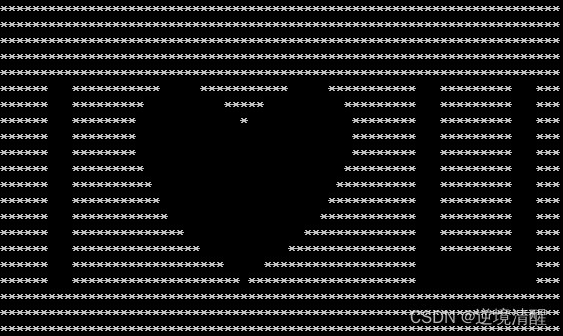
(1)一行代码画爱心 |
|
|
|
print(‘\n’.join([”.join([(‘Love'[(x-y)%len(‘Love’)] if ((x*0.05)**2+(y*0.1)**2-1)**3-(x*0.05)**2*(y*0.1)**3 |

|
a = [ print(‘\n’.join(a)) |
- import time
- y = 2.5
- while y>=-1.6:
- x = -3.0
- while x4.0:
- if (x*x+y*y-1)**33.6*x*x*y*y*y or (x>-2.4 and x2.1 and y1.5 and y>-1) or (((x2.5 and x>2.2)or(x>3.4 and x3.7)) and y>-1 and y1.5) or (y>-1 and y0.6 and x3.7 and x>2.2):
- print(' ',end="")
- else:
- print('*',end="")
- x += 0.1
- print()
- time.sleep(0.25)
- y -= 0.2
|
|
|
参考:https://blog.csdn.net/qq_55342245/article/details/120904578 |
- import time
- y = 2.5
- while y>=-1.6:
- x = -3.0
- while x4.0:
- if (x*x+y*y-1)**33.6*x*x*y*y*y or (x>-2.4 and x2.1 and y1.5 and y>-1) or (((x2.5 and x>2.2)or(x>3.4 and x3.7)) and y>-1 and y1.5) or (y>-1 and y0.6 and x3.7 and x>2.2):
- print('*',end="")
- else:
- print(' ',end="")
- x += 0.1
- print()
- time.sleep(0.25)
- y -= 0.2
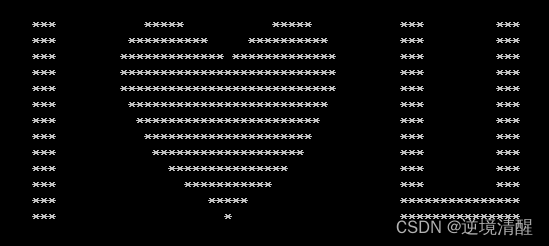
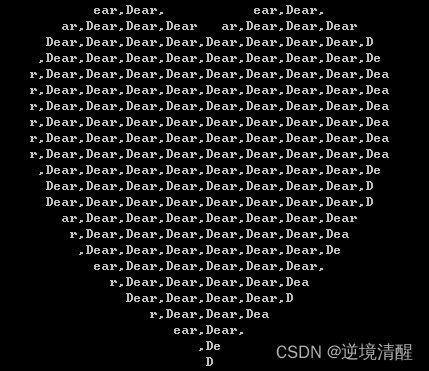
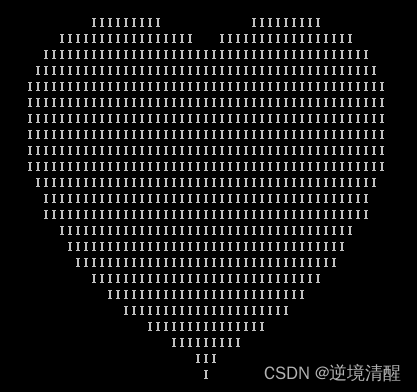
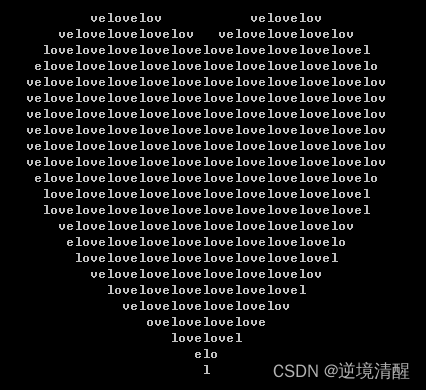
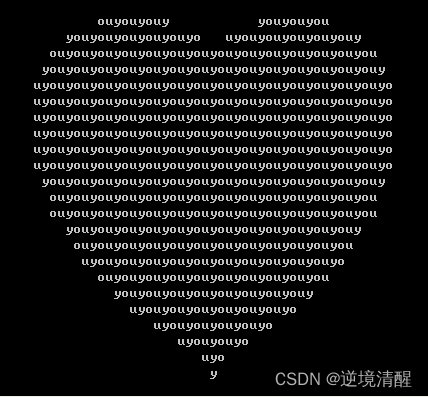
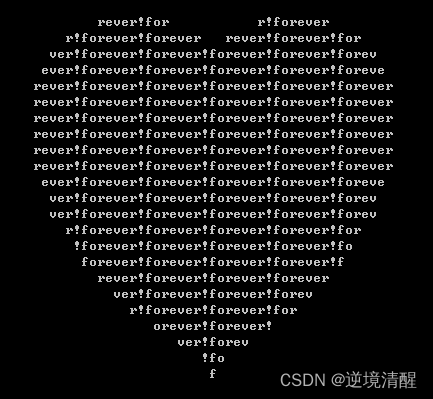
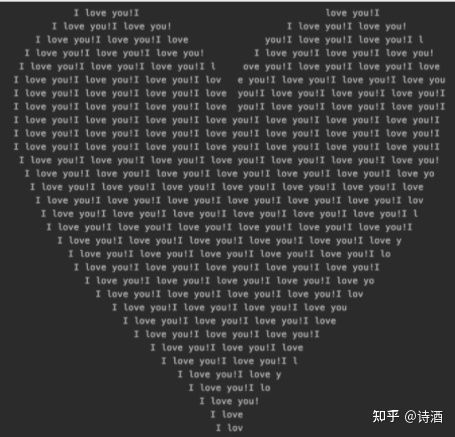
(3)输出五个爱心,由Dear I love you forever! 五个单词填充而成 |
|
|
|
|
|
|
|
|
|
|
|
转载地址:https://blog.csdn.net/qq_55342245/article/details/120904578 |

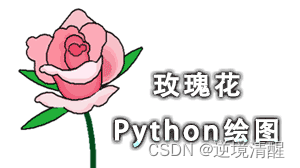
四、绘制玫瑰花
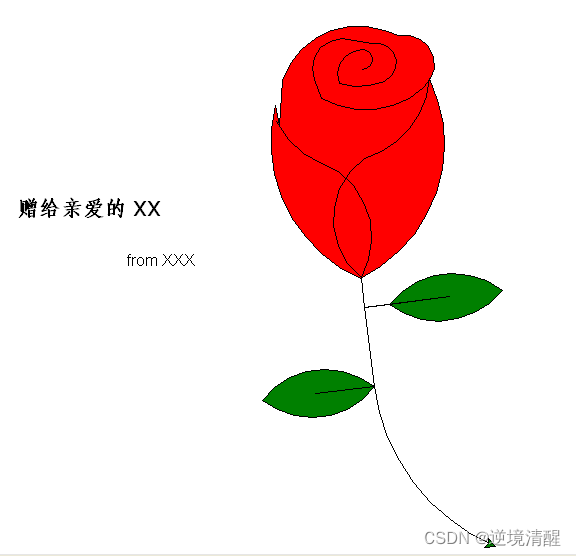
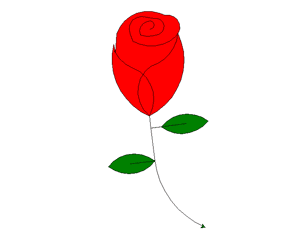
(1)、6种python玫瑰花绘图源码(立体多层玫瑰、红玫瑰)
|
|
|
|
| (1)立体多层玫瑰 | (2)红玫瑰 | (3)红玫瑰 |
|
|
|
|
| (4)红玫瑰 | (5)红玫瑰 | (6)红玫瑰 |


篇幅太长,请点击查看: 立体多层玫瑰绘图源码__玫瑰花python 绘图源码集锦
五、前端特效爱心

- span >html>
- html lang="en">
- head>
- meta charset="UTF-8">
- meta http-equiv="X-UA-Compatible" content="IE=edge">
- meta name="viewport" content="width=device-width, initial-scale=1.0">
- title>Documenttitle>
- head>
- body>
- canvas id="c">canvas>
- body>
- html>
- script>
- var b = document.body,
- c = document.getElementsByTagName('canvas')[0],
- a = c.getContext('2d');
-
- document.body.clientWidth; // fix bug in webkit: http://qfox.nl/weblog/218
-
- // ### Pixel Love - a js1k 2012 entry by @aaronsnoswell
- // This demo is on [github](https://github.com/aaronsnoswell/js1k-2012-love)
-
- // You can also browse the annotated source code at [http://aaronsnoswell.github.com/js1k-2012-love/docs/](http://aaronsnoswell.github.com/js1k-2012-love/docs/)
-
- // Define some variables:
-
- var h = "❤", // A heart
- g = 5, // The granularity - determines the size of each 'pixel'
- l = 10, // The threshold / limit, used for determining where to place pixels
- outline = [], // Arrays of locations for the outline and fill pixles
- fill = [],
- sx = 100, // Where to draw the heart
- sy = 450,
- box = [999, 999, 0, 0]; // The bounding box of the heart (computed later)
-
- // Set the canvas size
- c.width = 500;
- c.height = 800;
-
- // A utility function, used for looping over an x and y variable
- var loopxy = function(w, h, step, callback) {
- for(var x=0; x
- for(var y=0; y
- callback(x, y, step);
- }
- }
- }
-
- // Shortcut method for clearing the canvas
- a.clear = function() {
- a.clearRect(0, 0, c.width, c.height);
- }
-
- // Normalise browser font rendering in the canvas.
- // See [https://twitter.com/#!/aaronsnoswell/status/165642474109419520](https://twitter.com/#!/aaronsnoswell/status/165642474109419520)
- a.textBaseline = "bottom";
- a.font="300pt arial";
- a.lineWidth = g*2;
-
- // Draw a filled heart on the canvas
- a.fillText(h, sx, sy);
-
- // Loop over the entire canvas and wherever there are filled pixels,
- // store that location in the fill array
- var d = a.getImageData(0, 0, c.width, c.height)
- loopxy(d.width, d.height, g, function(x, y) {
- if(d.data[(x + y*d.width)*4+3] >= l) fill.push([x, y]);
- });
-
- // Clear the screen
- a.clear();
-
- // Draw an outline of a heart on the canvas
- a.strokeText(h, sx, sy);
-
- // Loop over the entire canvas once again. Wherever there are filled
- // pixels, store that location in the outline array
- var d = a.getImageData(0, 0, c.width, c.height)
- loopxy(d.width, d.height, g, function(x, y) {
- if(d.data[(x + y*d.width)*4+3] >= l) {
- outline.push([x, y]);
-
- // Compute the bounding box of the heart
- if(x
0]) box[0] = x; - if(x>box[2]) box[2] = x;
- if(y
1]) box[1] = y; - if(y>box[3]) box[3] = y;
- }
- });
-
- // Find the middle x and y locations of the heart
- box.push((box[0]+box[2])/2);
- box.push((box[1]+box[3])/2);
-
- // Store the current time as ms since epoch
- var t0 = new Date().getTime();
-
- // Use a recursive named function + setTimeout to ensure each frame has
- // time to finish before the next one is drawn
- (function render() {
- window.setTimeout(function() {
- // Time delta and elapsed time
- var d = new Date().getTime()-t0;
- t0 += d;
-
- // Clear the screen
- a.clear();
-
- // Draw the red heart
- a.fillStyle = "#f00";
- loopxy(fill.length, 1, 1, function(i) {
- var x = fill[i][0],
- y = fill[i][1];
- // Offset each pixel by a sinusoidal, time based ammount
- a.fillRect(x-g/2+Math.sin(t0/500+y/80)*(x-box[4])+10, y-g/2+10, g, g);
- })
-
- // Draw the outline using the same logic as above
- a.fillStyle = "#000";
- loopxy(outline.length, 1, 1, function(i) {
- var x = outline[i][0],
- y = outline[i][1];
- a.fillRect(x-g/2+Math.sin(t0/500+y/80)*(x-box[4])+10, y-g/2+10, g, g);
- })
-
- // Loop at 30fps
- render();
- }, 1/30);
- })();
- script>
-
(5)红心下落动画
原:74行代码实现浪漫的红心下落的动画效果_汪子熙的博客-CSDN博客
- html>
- canvas>canvas>
- script>
- var c = document.getElementsByTagName('canvas')[0];
- var b = document.body;
- var a = c.getContext('2d');
- function d(b, c, d, e) {
- a.fillStyle = b;
- a.beginPath();
- a.arc(c, d, e, 0, 2 * m.PI, !0);
- a.fill();
- a.fillRect(c, d, 1, 1)
- }
- m = Math;
- r = m.random;
- g = Date;
- l = +(new g);
- e = document;
- q = e.createElement("canvas");
- w = e.createElement("canvas");
- o = {};
- h = 100;
- H = 200;
- v = window;
- t = c.width = v.innerWidth;
- u = c.height = v.innerHeight - 5;
- b.setAttribute("style", "margin:0;background:#000");
- k = a;
- q.width = q.height = h;
- w.width = 1e3;
- w.height = H;
- for (j = 0; ++j
- for (i = 0; 1e3 > ++i; )
- a = q.getContext("2d"),
- z = .5 - i / h,
- f = j / h - .5 + .4 * m.sqrt(m.abs(z)),
- f = z * z + 2 * f * f,
- .23 > f && d(.16 "#F00" : "#F88", i, j, 0),
- a = w.getContext("2d"),
- d(j > 5e-4 * i * i - .3 * i + h ? "#343" : j > 4e-4 * i * i - .9 * i + 500 ? "#232" : "#000", i, j, 0);
- o[j] = {
- x: r() * t,
- y: -h - r() * u,
- b: 51 - j / 4,
- a: 25 + .4 * j
- };
- o[H + j] = {
- x: r() * t,
- y: r() * u - H,
- a: 3 * r() + 1,
- c: j
- }
- }
- a = k;
- v.setInterval(function() {
- n = +(new g);
- a.clearRect(0, 0, t, u);
- d("#FFA", H, 250, 150);
- d("#000", 270, 320, h);
- a.drawImage(w, 0, u - H, t, H);
- for (i = 0; ++i
- f = (n - l) / h,
- s = o[H + i],
- d("#FFA", s.x, s.y, m.floor(m.max(s.a + m.sin(s.c++ / 10) - .5, 1))),
- z = o[i],
- a.drawImage(q, z.x += -.1 / (z.b / h) * f, z.y += (5 - z.b / 10) * f, z.a, z.a),
- z.y > u && (z.y = -h),
- z.x x = t);
- l = n
- }, 60)
- //L
- script>
-
- html>
(6)《点燃我温暖你》中李峋的爱心代码
转载地址:HTML爱心代码 | 一起体验理工男的极致浪漫(电视剧男主同款)_陈橘又青的博客-CSDN博客
- span >HTML PUBLIC "-//W3C//DTD HTML 4.0 Transitional//EN">
- HTML>
- HEAD>
- TITLE> New Document TITLE>
- META NAME="Generator" CONTENT="EditPlus">
- META NAME="Author" CONTENT="">
- META NAME="Keywords" CONTENT="">
- META NAME="Description" CONTENT="">
- style>
- html, body {
- height: 100%;
- padding: 0;
- margin: 0;
- background: #000;
- }
- canvas {
- position: absolute;
- width: 100%;
- height: 100%;
- }
- style>
- HEAD>
-
- BODY>
- canvas id="pinkboard">canvas>
- script>
- /*
- * Settings
- */
- var settings = {
- particles: {
- length: 500, // maximum amount of particles
- duration: 2, // particle duration in sec
- velocity: 100, // particle velocity in pixels/sec
- effect: -0.75, // play with this for a nice effect
- size: 30, // particle size in pixels
- },
- };
-
- /*
- * RequestAnimationFrame polyfill by Erik Möller
- */
- (function(){var b=0;var c=["ms","moz","webkit","o"];for(var a=0;a
length&&!window.requestAnimationFrame;++a){window.requestAnimationFrame=window[c[a]+"RequestAnimationFrame"];window.cancelAnimationFrame=window[c[a]+"CancelAnimationFrame"]||window[c[a]+"CancelRequestAnimationFrame"]}if(!window.requestAnimationFrame){window.requestAnimationFrame=function(h,e){var d=new Date().getTime();var f=Math.max(0,16-(d-b));var g=window.setTimeout(function(){h(d+f)},f);b=d+f;return g}}if(!window.cancelAnimationFrame){window.cancelAnimationFrame=function(d){clearTimeout(d)}}}()); -
- /*
- * Point class
- */
- var Point = (function() {
- function Point(x, y) {
- this.x = (typeof x !== 'undefined') ? x : 0;
- this.y = (typeof y !== 'undefined') ? y : 0;
- }
- Point.prototype.clone = function() {
- return new Point(this.x, this.y);
- };
- Point.prototype.length = function(length) {
- if (typeof length == 'undefined')
- return Math.sqrt(this.x * this.x + this.y * this.y);
- this.normalize();
- this.x *= length;
- this.y *= length;
- return this;
- };
- Point.prototype.normalize = function() {
- var length = this.length();
- this.x /= length;
- this.y /= length;
- return this;
- };
- return Point;
- })();
-
- /*
- * Particle class
- */
- var Particle = (function() {
- function Particle() {
- this.position = new Point();
- this.velocity = new Point();
- this.acceleration = new Point();
- this.age = 0;
- }
- Particle.prototype.initialize = function(x, y, dx, dy) {
- this.position.x = x;
- this.position.y = y;
- this.velocity.x = dx;
- this.velocity.y = dy;
- this.acceleration.x = dx * settings.particles.effect;
- this.acceleration.y = dy * settings.particles.effect;
- this.age = 0;
- };
- Particle.prototype.update = function(deltaTime) {
- this.position.x += this.velocity.x * deltaTime;
- this.position.y += this.velocity.y * deltaTime;
- this.velocity.x += this.acceleration.x * deltaTime;
- this.velocity.y += this.acceleration.y * deltaTime;
- this.age += deltaTime;
- };
- Particle.prototype.draw = function(context, image) {
- function ease(t) {
- return (--t) * t * t + 1;
- }
- var size = image.width * ease(this.age / settings.particles.duration);
- context.globalAlpha = 1 - this.age / settings.particles.duration;
- context.drawImage(image, this.position.x - size / 2, this.position.y - size / 2, size, size);
- };
- return Particle;
- })();
-
- /*
- * ParticlePool class
- */
- var ParticlePool = (function() {
- var particles,
- firstActive = 0,
- firstFree = 0,
- duration = settings.particles.duration;
-
- function ParticlePool(length) {
- // create and populate particle pool
- particles = new Array(length);
- for (var i = 0; i length; i++)
- particles[i] = new Particle();
- }
- ParticlePool.prototype.add = function(x, y, dx, dy) {
- particles[firstFree].initialize(x, y, dx, dy);
-
- // handle circular queue
- firstFree++;
- if (firstFree == particles.length) firstFree = 0;
- if (firstActive == firstFree ) firstActive++;
- if (firstActive == particles.length) firstActive = 0;
- };
- ParticlePool.prototype.update = function(deltaTime) {
- var i;
-
- // update active particles
- if (firstActive
- for (i = firstActive; i
- particles[i].update(deltaTime);
- }
- if (firstFree
- for (i = firstActive; i length; i++)
- particles[i].update(deltaTime);
- for (i = 0; i
- particles[i].update(deltaTime);
- }
-
- // remove inactive particles
- while (particles[firstActive].age >= duration && firstActive != firstFree) {
- firstActive++;
- if (firstActive == particles.length) firstActive = 0;
- }
-
-
- };
- ParticlePool.prototype.draw = function(context, image) {
- // draw active particles
- if (firstActive
- for (i = firstActive; i
- particles[i].draw(context, image);
- }
- if (firstFree
- for (i = firstActive; i length; i++)
- particles[i].draw(context, image);
- for (i = 0; i
- particles[i].draw(context, image);
- }
- };
- return ParticlePool;
- })();
-
- /*
- * Putting it all together
- */
- (function(canvas) {
- var context = canvas.getContext('2d'),
- particles = new ParticlePool(settings.particles.length),
- particleRate = settings.particles.length / settings.particles.duration, // particles/sec
- time;
-
- // get point on heart with -PI
- function pointOnHeart(t) {
- return new Point(
- 160 * Math.pow(Math.sin(t), 3),
- 130 * Math.cos(t) - 50 * Math.cos(2 * t) - 20 * Math.cos(3 * t) - 10 * Math.cos(4 * t) + 25
- );
- }
-
- // creating the particle image using a dummy canvas
- var image = (function() {
- var canvas = document.createElement('canvas'),
- context = canvas.getContext('2d');
- canvas.width = settings.particles.size;
- canvas.height = settings.particles.size;
- // helper function to create the path
- function to(t) {
- var point = pointOnHeart(t);
- point.x = settings.particles.size / 2 + point.x * settings.particles.size / 350;
- point.y = settings.particles.size / 2 - point.y * settings.particles.size / 350;
- return point;
- }
- // create the path
- context.beginPath();
- var t = -Math.PI;
- var point = to(t);
- context.moveTo(point.x, point.y);
- while (t Math.PI) {
- t += 0.01; // baby steps!
- point = to(t);
- context.lineTo(point.x, point.y);
- }
- context.closePath();
- // create the fill
- context.fillStyle = '#ea80b0';
- context.fill();
- // create the image
- var image = new Image();
- image.src = canvas.toDataURL();
- return image;
- })();
-
- // render that thing!
- function render() {
- // next animation frame
- requestAnimationFrame(render);
-
- // update time
- var newTime = new Date().getTime() / 1000,
- deltaTime = newTime - (time || newTime);
- time = newTime;
-
- // clear canvas
- context.clearRect(0, 0, canvas.width, canvas.height);
-
- // create new particles
- var amount = particleRate * deltaTime;
- for (var i = 0; i
- var pos = pointOnHeart(Math.PI - 2 * Math.PI * Math.random());
- var dir = pos.clone().length(settings.particles.velocity);
- particles.add(canvas.width / 2 + pos.x, canvas.height / 2 - pos.y, dir.x, -dir.y);
- }
-
- // update and draw particles
- particles.update(deltaTime);
- particles.draw(context, image);
- }
-
- // handle (re-)sizing of the canvas
- function onResize() {
- canvas.width = canvas.clientWidth;
- canvas.height = canvas.clientHeight;
- }
- window.onresize = onResize;
-
- // delay rendering bootstrap
- setTimeout(function() {
- onResize();
- render();
- }, 10);
- })(document.getElementById('pinkboard'));
- script>
- BODY>
- HTML>
六、特色推荐
作者:@_猿来如此
作者:带中小学生玩转Python
https://blog.csdn.net/m0_63057469/article/details/126091105
https://blog.csdn.net/m0_48190198/article/details/123235264
用Pygame制作一场漂亮的流星雨
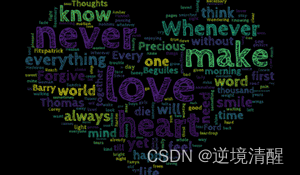
爱心字符云
https://blog.csdn.net/wangzirui32/article/details/115825539
https://blog.csdn.net/weixin_55822277/article/details/121370628
推荐阅读:
版权声明:本文为博主原创文章,遵循 CC 4.0 BY-SA 版权协议,转载请附上原文出处链接和本声明。